Authentication
 Documentation
 Development
 Premiere
 Check Types
Authenticating to NodePing
NodePing offers a variety of options to authenticate to your NodePing account:
- The default is Email and Password authentication.
- Login with Google.
- Login with Microsoft.
- Use your own custom OIDC authentication (Premiere plan only).
- An API token to utilize NodePing's API (Professional & Premiere plans).
Modify Contact Auth Types
When you sign up for a NodePing account, email and password authentication is used. By default, all auth types are enabled. Custom OIDC is only enabled for the Premiere plan. You can enable or disable specific authentication types by modifying the settings for a contact. From the ribbon menu, select "Contacts" and select "List Contacts". Find the contact you want to edit, and select the Auth Types you want to allow for that contact. We recommend setting the authentication types you are planning to use.
Email and Password
This is the default method used when you sign up for NodePing. You can change your email by going to "Contacts" in the dropdown menu and select "List Contacts". Find the contact you want to edit and select "Edit". You can change the email address by editing the existing contact method.
If you want to change your password, go to the "Account Settings" dropdown menu and select "Change Password".
Resetting Passwords
To reset a password for another contact, go to the "Contacts" dropdown menu and select "List Contacts". Find the contact you want to reset the password for, select "Edit", and at the bottom of the page choose "Reset Password". This will send a reset password email to that contact.
Sign in with Google
Google offers third-party sign-in which lets you link your Google account with your NodePing account. To link your account to a Google account, make sure the contact method for your contact contains an email address that is the same as the address of your Google account. Next, enable Google as an Allowed Auth Type for that contact as described above.
Log out of NodePing, and at the login screen select Google from the Login Method menu at the bottom of the login form. This will direct you to Google. Sign in with Google and follow their prompts. Once complete, you can use your Google account to sign into NodePing.
Sign in with Microsoft
Microsoft's third-party sign-in lets you link your Microsoft account with your NodePing account. To enable this, make sure the contact method for your contact contains an email address that is the same as the address of your Microsoft account. Next, enable Microsoft as an Allowed Auth Type for that contact as described above.
Log out of NodePing, and at the login screen select Microsoft from the Login Method menu at the bottom of the login form. This will direct you to Microsoft. Sign in with Microsoft and follow their prompts and accept. Once complete, you can use your Microsoft account to sign into NodePing.
Custom OpenID Connect
NodePing supports using your own custom OIDC service for Single Sign-on with our Premiere plan. A couple example setups exist on our blog to help you configure Keycloak and Microsoft Entra to authenticate accounts with NodePing. To enable this, make sure the contact method for your contact contains an email address that is the same as the address on your OIDC provider. Next, enable Custom OIDC Authentication for that contact as described above.
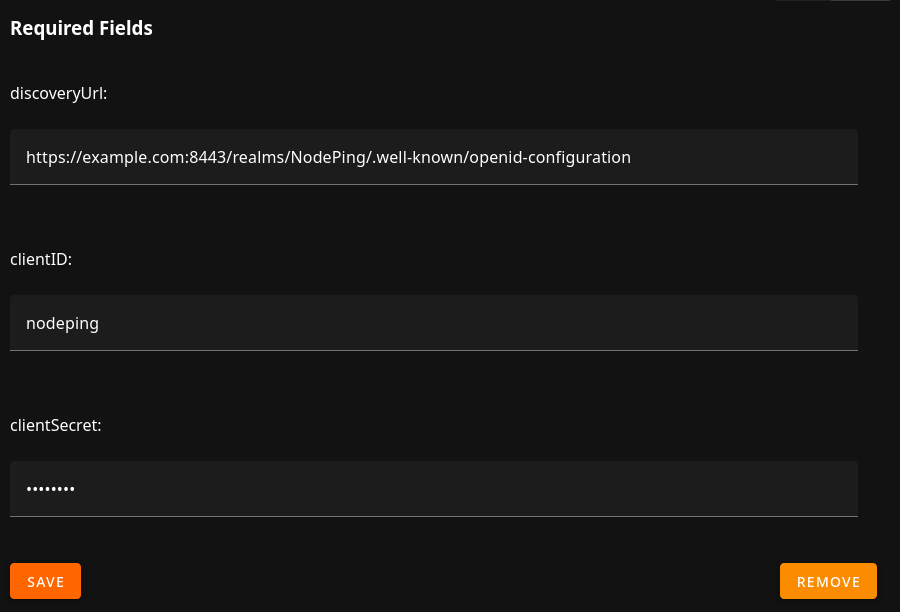
To configure NodePing to use your custom OIDC provider, go to the "Account Settings" dropdown menu and select "OpenId Connect". There are three pieces of information needed to authenticate with your OIDC provider:
- discoveryUrl: The OpenID endpoint URL, typically will end in "/.well-known/openid-configuration".
- clientID: The client identifier registered with the identity provider.
- clientSecret: The secret for that clientID.
Once that information is provided, to login with your OIDC provider visit https://app.nodeping.com/login/[your-customerid] which will redirect you to your OIDC provider. You can find your-customerid by clicking on your name in the top right corner of the page, and selecting Profile. The User Profile section will show your Customer ID.
As with the other authentication types, a valid contact on your NodePing account must contain a contact method with an address that maps to an email address on your OIDC provider.
